All these techniques are slightly more advanced than the fundamental methods, but don’t worry because anyone can perform them. The slight difference between advanced and fundamental techniques is that these methods require setting up a plugin or adding a line of code at specific points.
However, before delving into these advanced techniques, it’s crucial to understand the risks associated with website security and the potential consequences of neglecting it.
Understanding the Risks
Understanding the risks associated with website security is paramount for any WordPress website owner. In today’s digital landscape, websites face a myriad of threats ranging from automated bots scanning for vulnerabilities to sophisticated hacking attempts by malicious actors. These threats can lead to a variety of detrimental outcomes, including data breaches, loss of sensitive information, damage to reputation, and even financial losses.
Without adequate protection measures in place, websites become vulnerable targets, exposing not only the site owner’s assets but also potentially compromising the trust of users and visitors. To mitigate these risks effectively, it’s crucial to identify and comprehend the various potential threats that WordPress websites encounter.
Without further ado, let’s dive right into what you’ve probably been anticipating.
- Install a WordPress Backup Solution
Backing up your WordPress website is essential—it acts as your first line of defense against potential attacks. It’s important to recognize that no website is immune to security breaches, as even government websites can be vulnerable to hacking.
Backups give you the ability to quickly restore your WordPress site in case of any unexpected mishap.
There are numerous WordPress backup plugins available, both free and paid. The key is to regularly save full-site backups to a remote location, separate from your hosting account.
We recommend utilizing cloud services such as Amazon, Dropbox, or private clouds like Stash for secure storage of your backups.
The frequency of backups depends on how often you update your website. You can opt for daily backups or even real-time backups for added protection.
Thankfully, achieving this level of backup frequency is straightforward with plugins like Duplicator, UpdraftPlus, or BlogVault. These plugins are not only reliable but also incredibly user-friendly, requiring no coding expertise for setup and operation.
- Implement Two-Factor Authentication (2FA)
Two-factor authentication (2FA) adds an additional layer of security to your website login process by requiring users to go through two verification steps:
‒Username and Password: Users must first enter their username and password as usual.
‒Authentication Code: The second step involves entering a unique code generated by a device or app, such as a smartphone, that hackers cannot access.
Leading online platforms like Google, Facebook, and Twitter offer 2FA as an option for account security. Similarly, you can implement this feature on your WordPress site.
But the question is how to add Two-Factor Authentication (2FA) to your WordPress site?
Begin by installing and activating the WP 2FA – Two-factor Authentication plugin. The plugin features a user-friendly wizard that guides you through the setup process. Upon setup completion, you’ll be provided with a QR code.
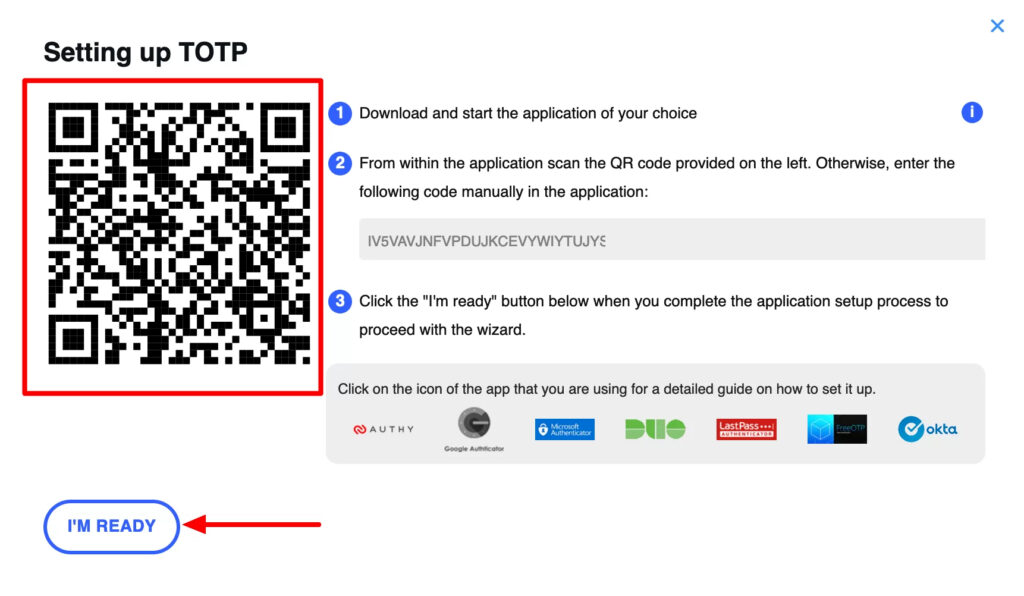
Use an authenticator app on your smartphone, such as Google Authenticator, Authy, or LastPass Authenticator, to scan the QR code. We recommend LastPass Authenticator or Authy for their cloud backup functionality, ensuring easy restoration of accounts in case of phone loss or replacement.
Open your authenticator app and click the ‘+’ or ‘Add account’ button. Use your phone’s camera to scan the QR code displayed on your computer screen. Grant the app permission to access the camera if required and assign a name to the account before saving it.
The next time you log in to your website, you’ll be prompted to enter the two-factor authentication code after providing your username and password.
Simply open the authenticator app on your phone to retrieve the one-time code and enter it on your website to complete the login process.
Implementing two-factor authentication adds an extra layer of protection to your WordPress site, enhancing its security against unauthorized access and potential security breaches.
- Keep Your PHP Version Updated
The WordPress platform is built using the PHP language, making it imperative to regularly update your PHP version. Similar to updating core files, plugins, and themes, PHP updates often include crucial security fixes essential for safeguarding your website.
However, updating your PHP version in WordPress is not directly possible. Instead, you must select your PHP version through your web hosting account. While this process may seem daunting for beginners, it’s relatively straightforward.
Here’s how to update your PHP version:
‒Log into your web hosting account and navigate to the cPanel.
‒Locate the Software section and select the ‘Select PHP Version’ option.
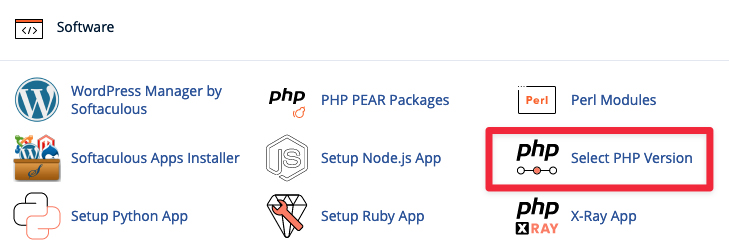
In the PHP Version settings, you’ll find a list of PHP extensions that are typically irrelevant for beginners. Focus on identifying your current PHP version, usually displayed at the top of the list. Utilize the drop-down menu to select the latest available PHP version.
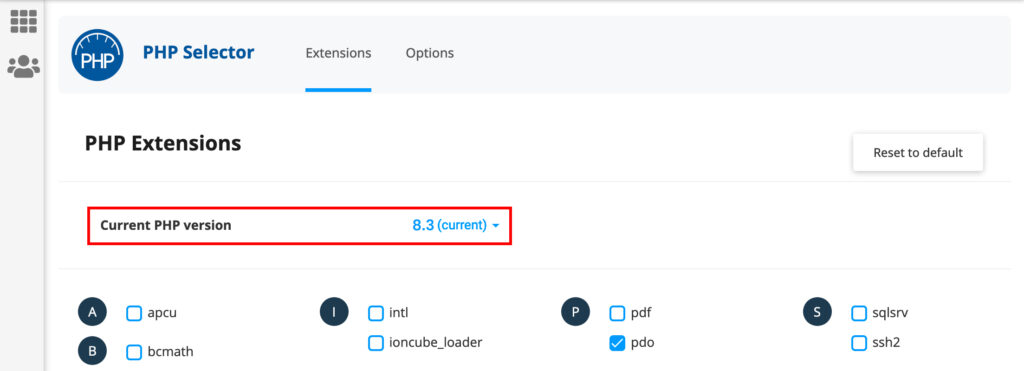
It’s essential to note that most web hosts may not automatically assign your website to the latest PHP version. However, even if your account was recently set up, you can typically change it to the latest PHP version available.
It’s prudent to exercise caution when updating to the latest PHP version, as it may occasionally disrupt WordPress applications if developers haven’t accounted for changes in the PHP environment. Always ensure you have a backup in place and be prepared to revert the change if necessary.
- Conceal the WordPress Version on the Frontend
When browsing a website, have you ever noticed a small disclaimer revealing the version of WordPress or other content management systems (CMS) being utilized? While it may seem harmless, this practice actually poses a significant security risk.
Consider this scenario: Suppose the website is running an outdated version of WordPress. Disclosing the specific version provides potential hackers with valuable information, enabling them to swiftly identify and exploit known vulnerabilities associated with older versions.
It’s worth noting that WordPress itself doesn’t display this information by default; rather, it’s often embedded within the website’s theme.
Fortunately, rectifying this issue is relatively simple. If you discover that your theme displays the WordPress version, you can easily address it. By accessing the theme’s functions.php file, you can add the following line of code:
remove_action('wp_head', 'wp_generator');
This straightforward line of code effectively removes the version message from being displayed. In rare cases where this feature is restricted to the Pro version of a theme, you may need to consider purchasing the premium version or opting for an alternative theme.
- Disable File Editing for Enhanced Security
WordPress includes a built-in code editor feature that enables users to modify theme and plugin files directly from the admin area. However, this functionality can pose a security risk if misused, which is why it’s prudent to disable it.
You can easily accomplish this by adding the following code to your wp-config.php file or using a code snippet plugin like WPCode:
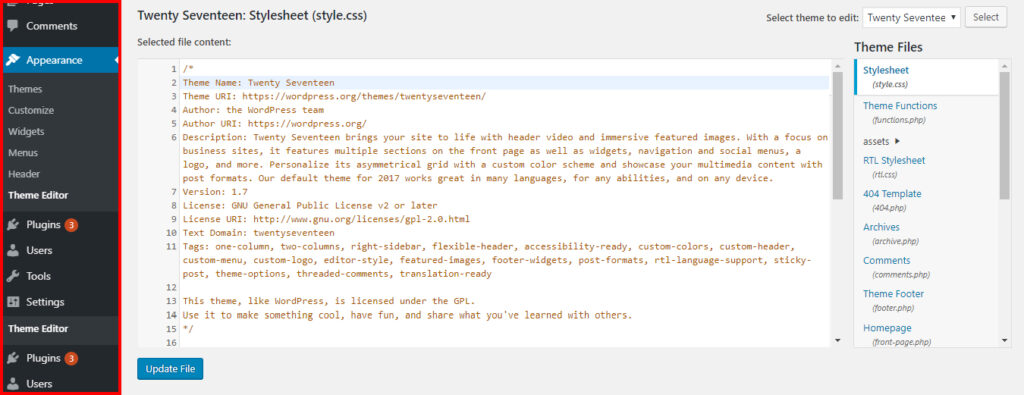
// Disallow file edit
define( 'DISALLOW_FILE_EDIT', true );
Alternatively, you can achieve this with just one click using the Hardening feature available in the free Sucuri plugin, as mentioned earlier.
This simple precautionary measure helps strengthen the security of your WordPress website by limiting access to sensitive files and reducing the risk of unauthorized modifications.
- Disable PHP File Execution in Specific WordPress Directories
To further enhance your WordPress security, consider disabling PHP file execution in directories where it’s unnecessary, such as /wp-content/uploads/.
You can achieve this by following these steps:
Open a text editor like Notepad and paste the following code:
<Files *.php>
deny from all
</Files>
And save this file as .htaccess.
Then upload the .htaccess file to the /wp-content/uploads/ directory on your website using an FTP client.
Alternatively, you can utilize the Hardening feature available in the free Sucuri plugin, as mentioned earlier, to implement this with just one click.
This precautionary measure helps mitigate the risk of executing malicious PHP files in specific directories, thereby fortifying the overall security of your WordPress site.
- Implement Login Attempt Limitations
By default, WordPress allows users to attempt logging in as many times as they wish, leaving your site vulnerable to brute-force attacks. These attacks involve hackers attempting to crack passwords by trying various login combinations.
You can mitigate this risk by restricting the number of failed login attempts a user can make. If you’ve already set up the web application firewall mentioned earlier, this feature is automatically enabled.
However, if you haven’t implemented the firewall, you can follow these steps:
‒Start by installing and activating the free ” Limit Login Attempts Reloaded ” plugin.
‒Once activated, the plugin will begin limiting the number of login attempts users can make. While the default settings are suitable for most websites, you can customize them according to your preferences. Navigate to Settings » Limit Login Attempts and click on the Settings tab. For instance, to comply with GDPR laws, you can select the ‘GDPR compliance’ checkbox.

Next, choose whether to receive notifications when someone is locked out. You can also change the email address for these notifications. By default, you’ll be notified on the third lockout.
‒Scroll down to the Local App section to set the number of login attempts allowed and the wait time for retries. The default wait time is 20 minutes.
‒You can increase the wait time after a specified number of lockouts. For example, after 4 lockouts, the user won’t be able to log in for 24 hours.
‒Avoid changing the ‘Trusted IP Origins’ setting for security reasons.
Remember to save your settings by clicking the ‘Save Settings’ button at the bottom of the screen.
- Disable Directory Indexing and Browsing
Directory browsing, also known as directory indexing, allows users to view the contents of directories on your website when there is no index file present (e.g., index.html or index.php). This feature can inadvertently expose sensitive information and potentially lead to security vulnerabilities if exploited by hackers.
To safeguard your website, it’s crucial to disable directory indexing and browsing. Follow these steps to accomplish this:
‒Access your website using an FTP client or your hosting provider’s file manager.
‒Navigate to the root directory of your website and find the .htaccess file. If you don’t see it, refer to our guide on why the .htaccess file may not be visible in WordPress.
‒Open the .htaccess file using a text editor and add the following line at the end:
Options -Indexes
Save the changes you made to the .htaccess file and upload it back to your website.
- Install a Reliable WordPress Security Plugin
Establishing an auditing and monitoring system to track all activities on your website is also a crucial step. This includes monitoring file integrity, logging failed login attempts, conducting malware scans, and more.
Fortunately, this task is easily accomplished by installing one of the top WordPress security plugins, such as Sucuri.
Begin by installing and activating the free Sucuri Security plugin.
Once activated, navigate to Sucuri Security » Dashboard to check if any immediate issues with your WordPress code have been detected by the plugin.
Next, proceed to the Sucuri Security » Settings page and access the ‘Hardening’ tab.
The default settings are suitable for most websites, so go ahead and activate them by clicking the ‘Apply Hardening’ button for each option. This effectively locks down key areas frequently targeted by hackers.
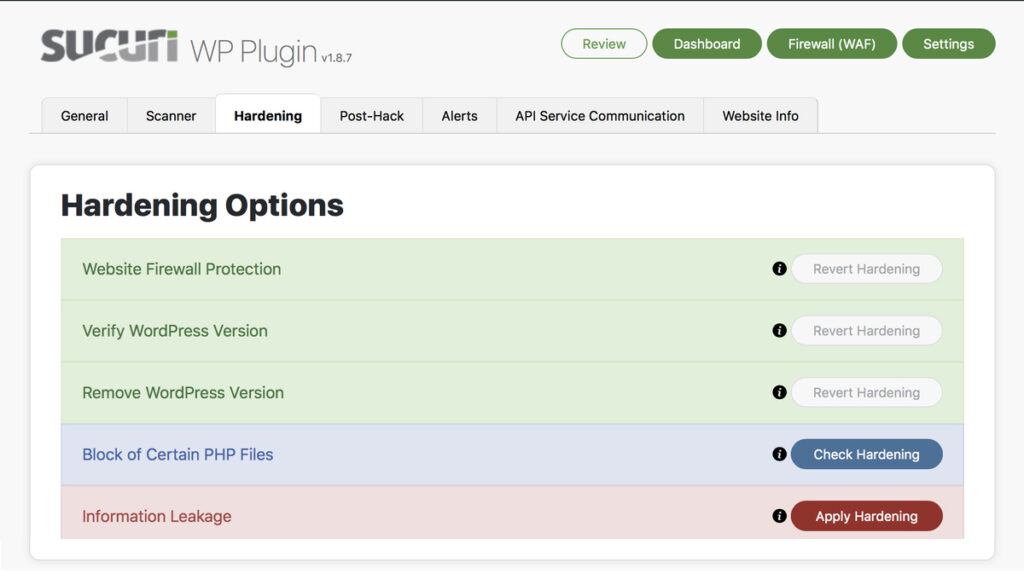
Once the hardening process is complete, the plugin’s default settings are typically sufficient for most websites and usually do not require further adjustments.
- Secure Your WordPress Login URL
The login area of WordPress functions as the gateway to your website, similar to the front door of your house. Just as you wouldn’t leave your front door unlocked, it’s crucial to secure your WordPress login area.
However, the default login URL in WordPress is widely known, presenting a security vulnerability. The good news is that we can change it.
While you could manually edit the code in the backend of WordPress to accomplish this, a simpler approach is to use the WPS Hide Login plugin. This plugin allows you to easily set a new login URL and configure redirection for attempts to access the old one.
For instance, instead of www.YourDomain.com/login, you could opt for www.YourDomain.com/door or any other custom URL. However, avoid using existing pages for this purpose.
When setting up redirection, direct users to a 404 page without disclosing the actual login URL.

- Disable XML-RPC in WordPress
XML-RPC is a fundamental WordPress API designed to facilitate communication between your WordPress site and external web or mobile applications. While it serves a useful purpose, XML-RPC can also be exploited by attackers to conduct brute-force attacks.
Traditionally, attackers would need to make individual login attempts, which could be detected and blocked by security plugins like Limit Login Attempts Reloaded. However, XML-RPC allows attackers to use the system.multicall function to try thousands of passwords with just a few requests, significantly amplifying the impact of brute-force attacks.
If you’re not using XML-RPC functionality on your WordPress site, it’s prudent to disable it to mitigate the risk of such attacks.
There are three methods to disable XML-RPC in WordPress, each with its own advantages:
‒Using .htaccess: This method is recommended for its efficiency and minimal resource usage. It involves adding rules to your site’s .htaccess file to block access to the XML-RPC file.
‒Using a Plugin: There are several plugins available that can disable XML-RPC functionality with ease, making it a straightforward option for beginners.
‒Editing the Functions.php File: For users comfortable with code, manually editing the functions.php file can achieve the same result, although it’s generally not recommended due to the risk of errors.
Additionally, if you’re using a web application firewall (WAF), XML-RPC may be disabled automatically as part of its security measures.
- Automatically Log Out Idle Users in WordPress
Logged-in users who remain inactive pose a potential security risk, as their sessions could be hijacked by unauthorized individuals. To mitigate this risk, you can implement automatic logout functionality for inactive users on your WordPress site.
Here’s how you can set this up using the Inactive Logout plugin:
‒Install and Activate the Plugin: Begin by installing and activating the “Inactive Logout” plugin on your WordPress site.
‒Configure Plugin Settings: Once activated, navigate to the “Settings » Inactive Logout” page in your WordPress dashboard. Here, you’ll find options to customize the logout settings.
‒Set Time Duration: Specify the time duration after which idle users should be automatically logged out. This duration can be adjusted based on your site’s specific requirements and security preferences.
‒Add Logout Message: Optionally, you can include a logout message that will be displayed to users upon automatic logout. This message can serve as a notification to users about the reason for their logout.
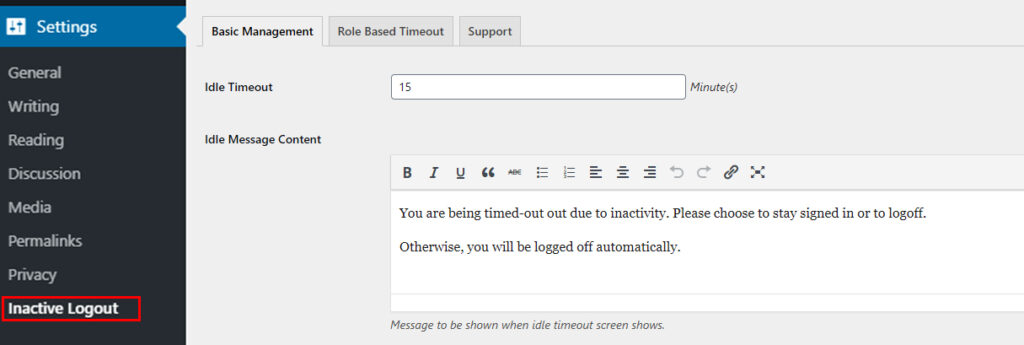
Save Settings: After configuring the desired logout settings, be sure to click on the “Save Changes” button to store your preferences.
- Malware and Vulnerability Scanning for WordPress
Scanning your WordPress site for malware and vulnerabilities is a crucial step in maintaining its security. While security plugins often conduct routine scans, it’s essential to manually scan your site if you notice unusual drops in traffic or search rankings.
You can perform manual scans using your WordPress security plugin or by utilizing specialized malware and security scanners available online. These scanners crawl through your website to identify known malware and malicious code.
However, it’s important to note that while these scanners can alert you to the presence of malware, they typically cannot remove it or clean a hacked WordPress site.
In the event of a malware detection, you’ll need to take immediate action to clean up your site and address any security vulnerabilities to prevent further compromise.
- Fixing a Hacked WordPress Site
Dealing with a hacked WordPress site can be a daunting task, but it’s essential to address the issue promptly to prevent further damage. While seeking professional assistance from security experts like Sucuri is highly recommended, some users may opt for a do-it-yourself approach.
However, it’s crucial to understand that fixing a hacked WordPress site requires technical expertise and a thorough knowledge of security protocols. Hackers often leave backdoors that need to be properly identified and addressed to prevent future attacks.
Regardless of the approach you choose, prioritizing the security of your WordPress site is paramount to safeguarding your data and maintaining the integrity of your online presence.
Pro Tip: Identity Theft and Network Protection
As a small business owner, safeguarding your digital and financial identity is paramount to protect against potential losses and security breaches. Hackers and cybercriminals can exploit vulnerabilities to steal sensitive information, compromise bank accounts, and even commit fraudulent activities in your name.
The Federal Trade Commission (FTC) reported a staggering 5.7 million incidents of identity theft and credit card fraud in 2023 alone, highlighting the pervasive threat posed by cybercrime.
To fortify your defenses against identity theft and network vulnerabilities, consider utilizing a reputable identity theft protection service like Aura. With Aura, you gain access to comprehensive identity theft and credit monitoring solutions designed to shield you from online threats.
Aura offers device and Wi-Fi network protection through its free VPN (virtual private network), which employs military-grade encryption to secure your internet connection, ensuring privacy and security even when accessing sensitive information remotely, such as from public Wi-Fi networks.
Furthermore, Aura’s dark web monitoring service utilizes advanced artificial intelligence to continuously scan the dark web for any signs of compromised passwords, social security numbers, or bank account information associated with your identity. In the event of a potential breach, Aura promptly alerts you, enabling you to take immediate action to safeguard your digital identity and mitigate any potential risks.
Conclusion
Protecting your WordPress website from cyber threats is crucial due to the platform’s popularity among hackers. Security measures should be regularly updated as threats evolve. By implementing effective WordPress security measures, you can reduce the risk of attacks and keep your website safe. We hope this article has helped you understand the importance of website security and how to enhance it.
