The Shopify checkout process marks a pivotal stage in the customer’s purchasing journey. At this point, the customer has made the decision to buy, and it’s essential that the checkout experience is seamless and efficient. Its primary function is to gather shipping details, process payments securely, and confirm the order. Ensuring simplicity and clarity in this process is paramount to maximizing conversions and overall sales.
There’s a common misconception among Shopify merchants that customizing the checkout page is only possible with Shopify Plus. However, this notion is inaccurate. Even with a Shopify Basic plan, there are numerous elements that you can customize. A significant development announced by Shopify in the Winter 2023 Editions is the introduction of the one-page checkout option, which has generated considerable excitement in the Shopify community.
Our comprehensive guide is designed to provide you with valuable insights and practical tips for enhancing your Shopify checkout experience to drive better performance, including increased conversions and higher average order values.
Tip #1 – Incorporate Your Brand Logo
By default, Shopify utilizes your store name and presents it as text above the breadcrumb navigation during checkout. However, you have the option to enhance this by uploading your business logo, which fosters trust and seamlessly integrates the checkout process with your storefront.
To upload your custom logo to the checkout, navigate to your store admin, then go to Online Store > Themes, and click on Customize your live theme.
In the bottom-left corner, click on Theme settings and select Checkout. In the Logo section, click on Select image, upload your logo, and confirm by clicking on Select. Review the visual appearance to ensure compatibility with both desktop and mobile views, and click on Save if satisfied.
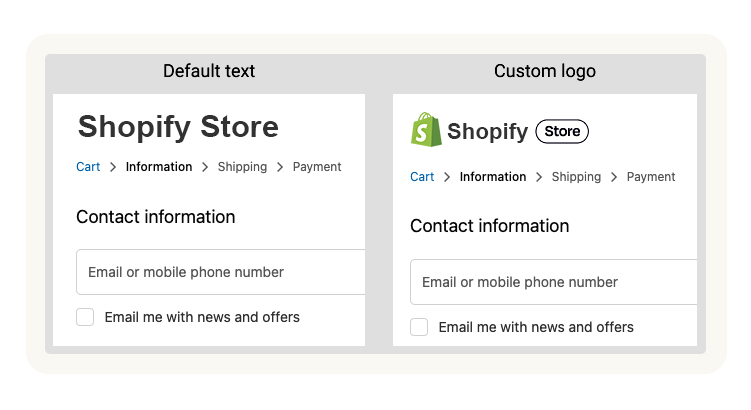
This simple step can significantly enhance your brand’s presence and professionalism throughout the checkout experience.
When selecting your logo, it’s important to consider dimensions. Although Shopify doesn’t provide specific recommendations, we advise using a small logo size with a precise height of 40 pixels, positioned to the left.
This ensures consistency across desktop and mobile devices without compromising the quality. Please note that these dimensions are optimized for the Dawn 2.0 theme.
The maximum height dimensions for other sizes are provided in the table below:
Logo size | Small | Medium | Large |
Height (mobile) | 30px | 40px | 50px |
Height (desktop) | 40px | 60px | 80px |
Tip #2 – Personalize Shopify Checkout Colors & Fonts
The checkout user experience is greatly influenced by design elements such as colors and fonts. By default, Shopify employs a blue color scheme for buttons and the System font, which may differ from the style of your product or cart pages, causing a disjointed experience.
Fortunately, rectifying this is straightforward. Begin by navigating to your store admin, then proceed to Online Store > Themes, and click on Customize your live theme.
In the bottom-left corner, click on Theme settings and select Checkout. Scroll down to Typography and choose the font used on your storefront; if unavailable, retain the System font.
Within the Colors section, adjust buttons and link colors to match those on your product/cart pages.

Customizing colors and fonts ensures consistency throughout the checkout process, enhancing the overall user experience and reinforcing your brand identity.
For stores with a dark theme, consider maintaining a white background for the checkout. While dark backgrounds may seem appealing, lighter colors are generally preferred for forms and checkout processes.
A prime example is Spotify, known for its dark UI but opting for a white checkout interface during the subscription process.
Even with a predominantly dark theme, utilizing white forms fosters a smoother checkout experience, as demonstrated by Spotify.
Tip #3 – Customize Texts in the Checkout Process
Contrary to popular belief, you can modify text elements within the Shopify Checkout process without requiring Shopify Plus. This flexibility enables you to tailor various texts to better suit your brand and enhance the overall checkout experience for customers.
Here’s how you can edit texts in the Shopify Checkout:
- Navigate to your store admin > Online Store > Themes. Click on Actions for your live theme, and select Edit languages.
- In the top navigation, choose Checkout & system. Here, you’ll have the option to edit various texts such as buttons, links, footer information, and navigation labels.
- Once you’ve made your desired changes, click on Save and review the modifications on your live site.

Tip #4 – Enhance Trust with Trustmarks (Trust Badges)
Building trust is paramount to reducing cart abandonment rates, particularly concerning concerns about the security of payment information. According to the Baymard Institute, 17% of customers abandon their carts or checkout processes due to a lack of trust in the store’s ability to secure their payment details.
While many free Shopify apps offer trust badges for the storefront, integrating them into the checkout process directly can be challenging. Nevertheless, there are several strategies to bolster trust during the checkout process:
- Utilize your brand logo throughout the checkout process to reinforce brand identity and credibility (as discussed in tip #1).
- Customize the style and design of your checkout pages to maintain consistency with your storefront (refer to tip #2).
- Modify text elements within the Shopify checkout process to convey trustworthiness and transparency (outlined in tip #3).
- Provide clear contact information to reassure customers of your accessibility and reliability (as suggested in tip #5).
Tip #5 – Provide Accessible Contact Information or Integrate Live Chat Support
Displaying contact information prominently during the Shopify checkout process can significantly enhance the conversion rate for several reasons.
Firstly, it instills trust in customers, as they perceive the presence of a phone number as a means to address any potential issues with their orders.
Secondly, some customers may encounter difficulties during checkout and require immediate assistance.
Lastly, in certain regions, customers may feel more reassured about the legitimacy of the store when they see contact information readily available.
A best practice is to include a discrete message such as “Need help? Contact us on X” within the checkout interface. While this can be achieved by adjusting theme texts (as mentioned in tip #3), a more elegant approach involves incorporating this information into your logo image (as suggested in tip #1) alongside other relevant details.

Another effective strategy is to embed an online chat widget directly into the checkout page.
While this functionality is typically available only to Shopify Plus users due to the requirement of adding custom JavaScript to the checkout page, it offers a convenient way to provide real-time assistance to customers navigating the Shopify checkout process.
This can significantly improve the customer experience and increase the likelihood of completing the purchase.
Tip #6 – Increase Average Order Value with Upselling and Cross-Selling
Upselling and cross-selling are effective strategies for boosting the average order value of your store. While these techniques are typically implemented before the checkout phase, recent updates to the Shopify platform, such as the post-purchase checkout extension, now allow for upselling and cross-selling opportunities during the Shopify checkout process itself.
One of the significant advantages of post-purchase upsells is that customers do not need to re-enter payment information. Additional purchases can be made with just one click, streamlining the process and increasing customer convenience.
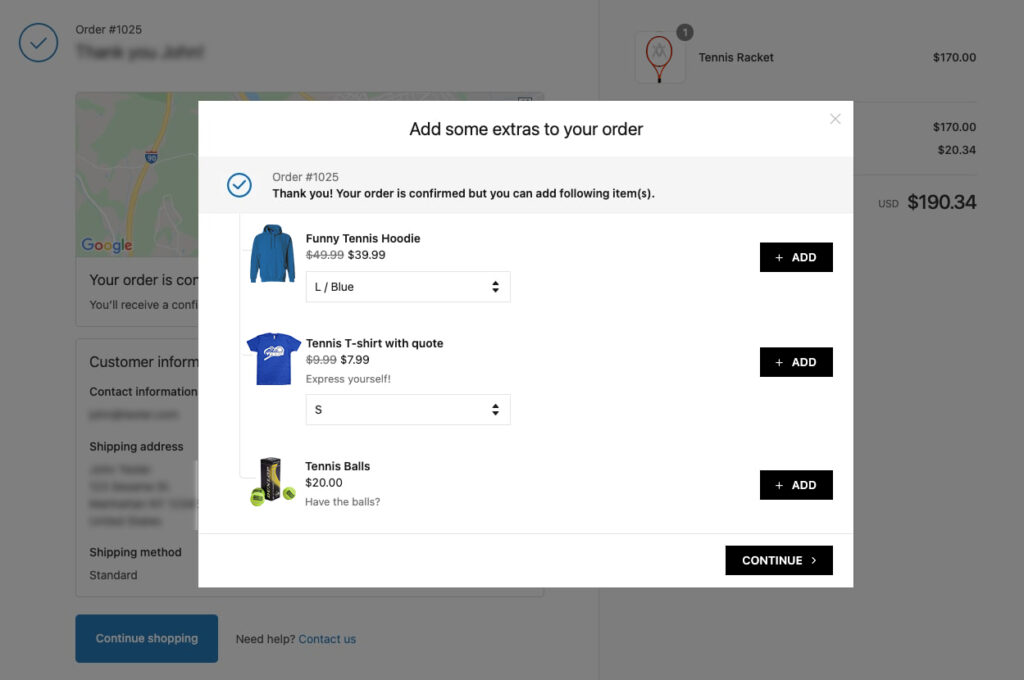
To implement post-purchase upsells, you’ll need to utilize third-party apps. Here are some recommended options:
- Last Upsell: A straightforward app for offering post-purchase upsells on the thank you page and post-purchase step.
- Checkout Promotions: A more advanced app offering extensive customization possibilities for upselling.
- Zipify OCU: An all-in-one upsell app covering the funnel from pre-purchase to post-purchase stages.
When employing post-purchase upselling strategies, consider offering discounts to incentivize additional purchases. This represents your final opportunity to upsell to the customer and should be approached with a slightly more aggressive stance.
Additionally, you can also leverage built-in native upsells through the shipping method. For detailed instructions on implementing this strategy, refer to our article on free, no-app Shopify checkout upsells.
Tip #7 – Provide Incentives such as Free Shipping or Gifts
To encourage customers to complete their checkout process, it’s effective to offer them incentives. One proven tactic is to provide incentives like free shipping or complimentary gifts.
Offering a free gift product with a purchase can be accomplished through various methods, one of which is using a dedicated app like Gift Box.
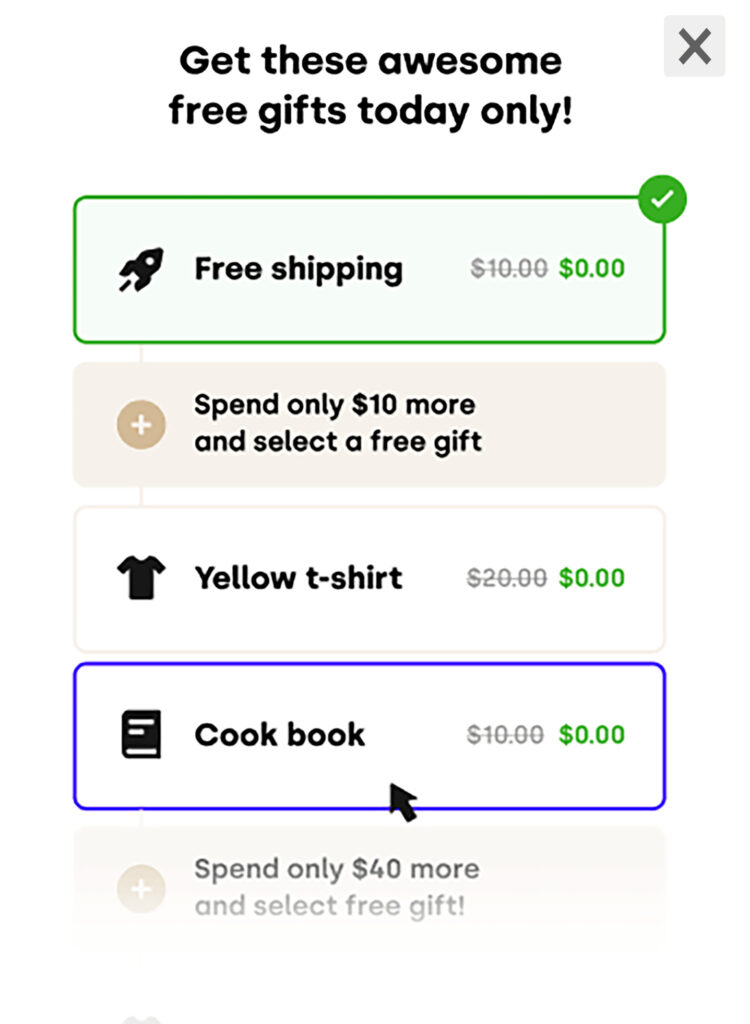
For free shipping, you can set this up directly within your Shopify store. To do so, go to your store admin, then navigate to Settings > Shipping and delivery.
In the Shipping section, click on Manage rates. Add a rate within the specific shipping zone by selecting ‘Set up your own rates.’
Name it something like ‘Free Shipping‘ and add a condition based on minimum weight or price if necessary.
Once done, you should now see this rate available in your checkout.
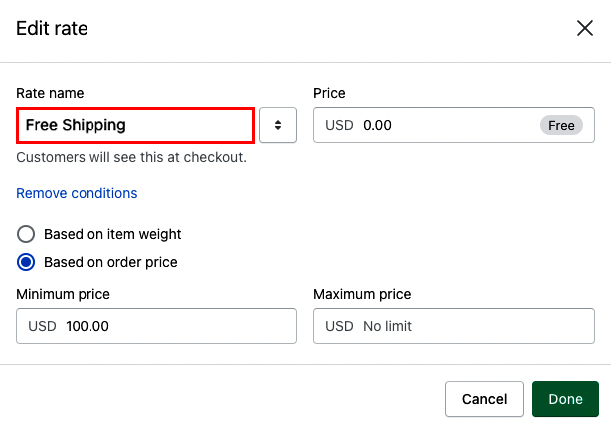
Additionally, you can restrict the free shipping rate to specific geographical regions using shipping zones or selected products.
It’s a good practice to prominently display information about free shipping near the add-to-cart button, including any minimum requirements. Avoid relying solely on site-wide banners, as visitors may overlook them.
Tip #8 – Offer Carbon Neutral Shipping
In alignment with Shopify’s commitment to sustainability, offering carbon-neutral shipping is not only environmentally responsible but can also enhance conversions.
You can implement carbon-neutral shipping using either the official Offset app from Shopify or third-party apps, many of which are available for free. Third-party apps often provide additional benefits, such as displaying information to customers and allowing you to choose whether to cover the extra costs or leave it optional for customers to contribute.
For example, the EcoCart app enables customers to add carbon neutrality to their orders.

Moreover, when customers pay via Shop Pay or select Shopify Shipping, the associated costs are covered by Shopify as part of its corporate responsibility efforts.
Tip #9 – Enable Customer Tipping at Checkout
Allowing customers to leave tips during the Shopify checkout process can be a meaningful way for them to show appreciation for your products or services. Shopify provides an integrated solution for enabling tipping, making it a seamless part of the payment step.
Here’s how to enable tipping in your Shopify store:
- Navigate to your store admin > Settings > Checkout.
- Scroll down to the Tipping section and check the option “Show tipping options at checkout.”
- Set your tipping tiers, typically ranging from one to three options. Consider deselecting “Show tip options to all customers” and setting tip levels to percentages like 5%, 10%, and 15% for simplicity.
- Confirm your settings by clicking on Save.
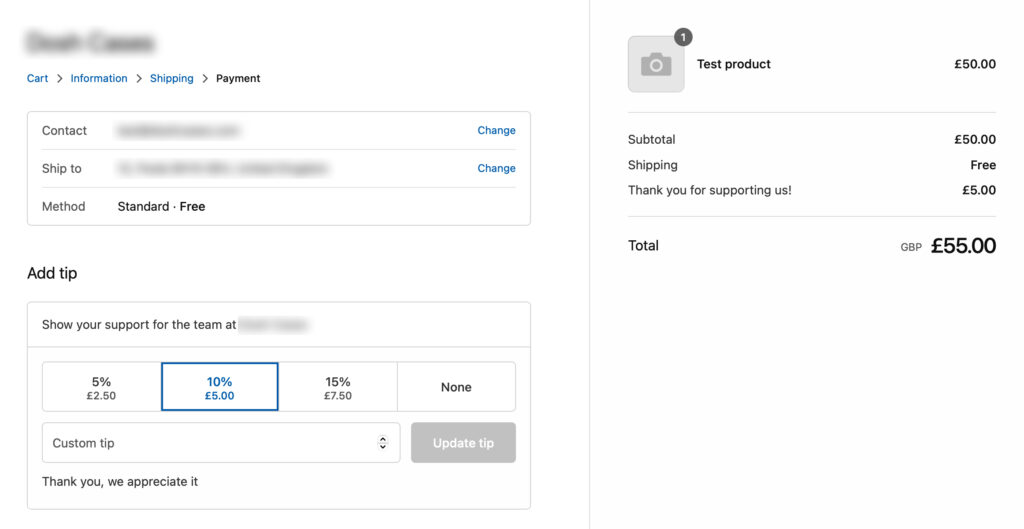
Keep in mind to monitor the impact of tipping on your overall checkout conversion rate. While adding tipping options can enhance customer satisfaction, it’s essential to ensure that it doesn’t negatively affect the checkout experience.
You can find more detailed guidance on setting up tipping in Shopify checkout in our comprehensive guide.
Tip #10 – Implement Guest Checkout Option
Avoid hindering your customers’ purchasing experience by requiring them to create an account before completing their purchase. According to Baymard Institute, forced account creation can lead to as much as 37% of customers abandoning the purchase process.
To enable guest checkout, also known as anonymous checkout, follow these straightforward steps:
- Navigate to your store admin > Settings > Checkout.
- Under the Customer accounts section, select the option “Accounts are optional.”
- Confirm your selection by clicking on Save.
While customer accounts offer benefits for returning customers, consider implementing post-purchase account creation. This approach prompts customers to create an account after their initial purchase, enhancing the user experience without deterring potential buyers.
You can explore third-party apps like Smart Account Activate or WOTIO Account Invites Plus, which facilitate post-purchase account creation and are free to install.
Tip #11 – Enable Address Autocompletion
Enhance the checkout experience for your customers by enabling address autocompletion. Since 2017, Shopify has integrated the Google Places Autocomplete API to assist customers in filling their shipping and billing information accurately.
To enable address autocompletion, follow these steps:
- Go to your store admin > Settings > Checkout.
- Scroll down to the Order processing section and check the option “Enable address autocompletion.”
- Confirm your selection by clicking on Save.

Address autocompletion leverages Google’s smart suggestions to streamline the checkout flow, reducing the likelihood of input errors and improving overall efficiency.
Note that address autocompletion is available in select countries supported by Google, with new countries continually being added to the list.
Tip #12 – Offer Checkout with Mobile Phone Number
Provide customers with the option to complete their checkout using their mobile phone number instead of an email address. This feature offers flexibility and convenience, particularly for customers who prefer SMS communication or may not check their email regularly.
To enable this option, access your store admin and navigate to Settings > Checkout. In the Customer contact section, choose the setting “Customers can check out using either their phone number or email.”
Additionally, you can opt to enable the “Show an option to subscribe at checkout” feature in the Marketing consent section to gather consent for future marketing communications.
Make sure to save your selections after making these adjustments.
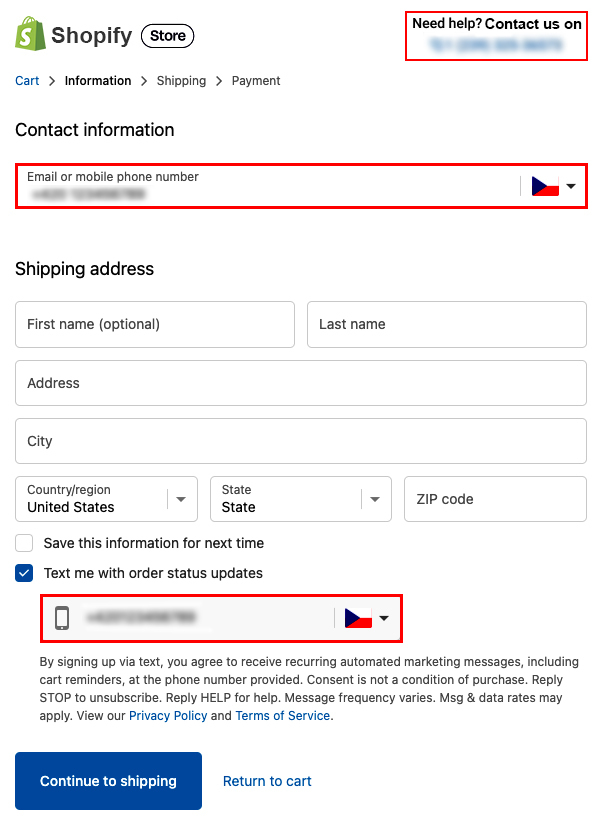
Ensure compliance with regulations such as the Telephone Consumer Protection Act (TCPA), which requires businesses to obtain explicit consent before sending promotional or transactional messages via SMS.
Tip #13 – Provide Clear Refund and Return Information
When shopping online, customers often seek clarity on shipping costs, return policies, and refund procedures. While shipping is typically addressed during the Shopify checkout process, return and refund policies vary among stores.
To enhance transparency and instill confidence in your customers, it’s essential to include direct links to your Refund/Return Policy and other legal documents, such as the Privacy Policy or Terms of Service, in the footer of your checkout page. This not only fosters trust but also ensures that shoppers can easily access important information before completing their purchase.
Here’s how you can add these links:
- Go to your store admin > Settings > Policies.
- Add your legal policies to the relevant sections. If you don’t have existing policies, you can utilize the default templates provided by Shopify.
- Save your changes, and the links will automatically appear in the footer of your checkout page.
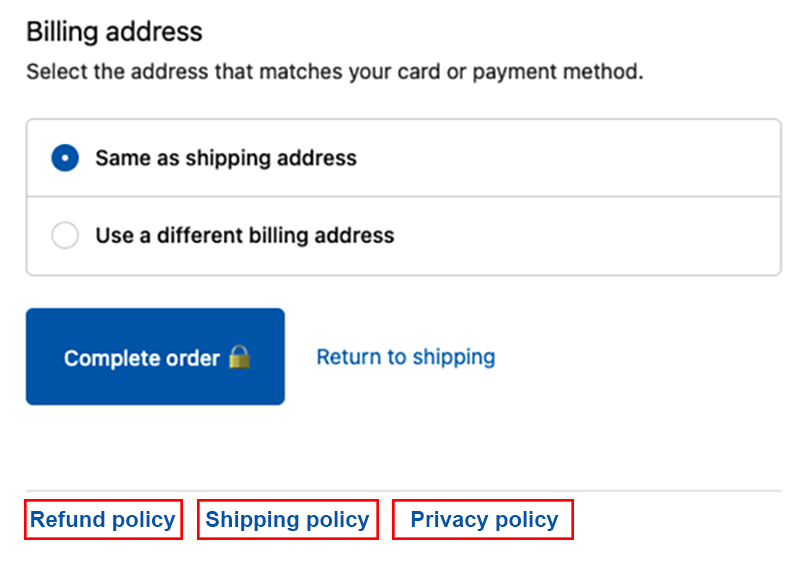
It’s advisable to include links to your Refund Policy, Shipping Policy, and Privacy Policy in the checkout footer for comprehensive coverage. If you’ve customized your policy names but want to reflect these changes in the checkout footer, you can easily update the links via theme languages in your Shopify settings.
While displaying policies in the checkout footer is beneficial for transparency, it’s important to note that custom text options are limited in this section.
Understanding Checkout Conversion Rates
According to research conducted by the Baymard Institute, a leading UX research organization in e-commerce, the average checkout drop-off rate stands at 69%, resulting in a checkout conversion rate of 31%. As a merchant, your objective should be to surpass this average and achieve a higher conversion rate.
Successful Shopify stores often achieve conversion rates exceeding 60%, indicating a drop-off rate of less than 40%. It’s worth noting that conversion rates can vary based on factors such as traffic sources and device usage, with desktop traffic typically yielding higher conversion rates compared to mobile traffic.
Optimizing your Shopify checkout process is an ongoing endeavor, with continual testing and refinement necessary to improve conversion rates and maximize average order value. Striking the right balance between a seamless checkout experience and effective strategies to increase order value is key to driving success in e-commerce.
